by R. Primm
One of the previous e-mail tips mentioned milling contours on CNC mills, the kind that are difficult to tool up for, by going around the part and milling the top surface in the same setup…
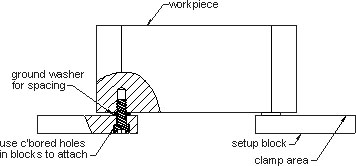
A method that has worked well for me for many years now is as follows: Drill and tap small mounting holes on the bottom of the part (usually in a location that will not interfere with the performance of the part). Place ground washers over those holes and mount the part and washers on ground blocks with counterbored holes in them. The blocks should be long enough to put clamps at the outside edges and still not interfere with the tools used to mill around the perimeter of part. We use a 2″ diameter inserted face mill on a long holder for most of this type of setup. Using this size cutter will require the distance between the outside of the part perimeter and clamping device to be a minimum of 2″. My first step is to face the top of part, and then I put in any holes that the blueprint calls out. If those holes can’t be used to secure the part to the setup blocks after turning the part over, I will also add a few small tapped holes for attaching the blocks (that is if customer will allow these additions).

This type of setup will allow pretty heavy milling passes and even drilling large through holes in the part without getting into the face of the milling table. Spacing the part away from the setup blocks with the washer will help to keep the cutter away from the blocks and will result in longer life for the blocks. I usually keep five or six washers of each hole size, 1/4″, 3/8″, 1/2″, and 5/8″. The holes are usually made 1/32″ larger than the fractional bolt size. Once you get tooled up for this type of milling, you will most likely use it over and over again–I’ve had good results at the last two shops I worked at using this type of setup.
Thanks Mr. Primm! Your subscription has been extended by an issue.
