by Ed Nisley
I don’t do any fancy 3D milling, so it takes a lot of Z-axis backlash to get my attention. While setting up for some circuit board drilling, I finally noticed the backlash far exceeded even my slovenly specs: something like 20 mils.
The Z-axis backlash adjusting nut on the saddle was as snug as it usually is. Heaving on the saddle, though, pulled it up and down and moved the handwheel on the top of the Z-axis motor.
Ah-ha! That says the leadscrew itself is moving, which shouldn’t be possible because it’s captured at the bearings in the stepper motor mount.
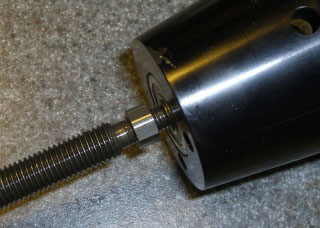
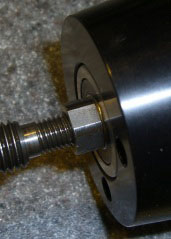
Some tedious disassembly later, the top picture shows the Z-axis leadscrew and motor mount, with the nut obviously too far away from the lower ball bearing housing. The nut was finger-loose (Photo 1) and I moved it while extracting the leadscrew; it’s supposed to be snug against the bearing in normal operation.
The solution is a drop of Loctite, which should be applied to the canonical “clean and dry” threads. Hosing this part of the leadscrew down with solvents isn’t a good idea, because you don’t want any inside the lower bearing in the motor mount, so I spent some Quality Shop Time spinning the threads against a (dry) rag, running the nut to the other end (all of a few millimeters), and repeating until most of the oil was gone.
Sherline documents how to assemble and install the motor mounts, so there’s not much mystery involved. I loosened the preload nut until the housing spun freely on the shaft, then tightened it a teensy bit; the housing still spun freely and there’s no detectable end play.
Reinstallation requires putting the motor mount at the same spot on the Z-axis column as before. I moved the saddle to the top of the column, ran the leadscrew into the saddle nut, and then tightened the motor mount screws. That allows the mount to move to suit the saddle nut’s position, rather than going through the tedious saddle alignment process I mentioned as part of the gib adjustment.
It’s all good…call it 3 mils of backlash on all three axes (Photo 2).
Memo to Self: It’s possible to run the Z-axis backlash adjusting nut off the top of the leadscrew thread, then re-engage it without removing the motor mount. The trick is to hold the anti-backlash nut firmly against the saddle nut while turning the leadscrew to engage the thread. Remember that it’s a left-hand thread…
Thanks Ed. You’re subscription has been extended by an issue. If you’d like your subscription extended by an issue, please send your short tip (300 words, 1 or 2 photos) to gbulliss@villagepress.com.
Please do us a tremendous favor and forward this e-mail to your machining friends!
Please do us a tremendous favor and forward this e-mail on to your machining friends!
Are you not a subscriber to DIGITAL MACHINIST? Visit us at www.digitalmachinist.net and request a no-obligation issue, or call and request it at 1-800-447-7367. Tell them you received an e-mail from a friend!
And don’t forget to check out Digital Machinist’s page on Facebook and our Twitter feed!
Your friend thinks you’ll enjoy DM, or you wouldn’t have this e-mail!
We hope you enjoyed this e-mail tip, brought to you by your friends at Digital Machinist.
Get Involved!
Do you enjoy our e-mail tips? Has one of them ever “knocked something loose” in your head? Your tip could be a future e-mail blast from your favorite magazine. Just send your tips to george.bulliss@VPDemandCreation.com. If we use your tip, we will extend your subscription by an issue. We like to see 200 to 300 words, plus an image, if available. Thanks!